
I don't think I want to read the ingredients on the Pop-tarts box. It's a long list and all I know is that there are some unnatural stuff in there, right? I also love the idea of making anything homemade. It's obviously more time consuming than simply grabbing a box off the shelf at the supermarket, but homemade is much more rewarding.

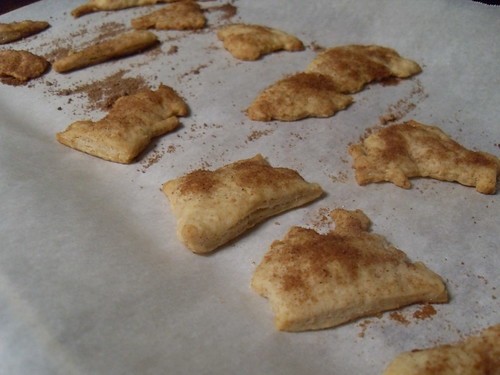
Since I knew I wasn't going to have time Friday morning to make everything, I made the dough on Wednesday. The dough is extremely easy to work with. It doesn't stick to your hands too much. I kept it in the fridge until Friday morning, which was when I rolled it, shaped it, baked it. With the help of a little flour, the dough will not stick to your counter or your rolling pin. Also, I replaced 1/2 cup flour with 1/2 cup whole wheat flour to make it more healthful. Though this pastry doesn't taste exactly like the real Pop-tarts, it's still really great. I love it! I'm pretty terrible at rolling dough out to a specific dimension, so I actually ended up with about 7 pop-tarts. I only made the brown sugar cinnamon filling, but nutella or jam sound amazing too. I'm a big fan of strawberry filling. Oh, and make sure you bake the leftover dough sprinkled with cinnamon sugar!

Besides sweet versions, you can make savory pastries, too! Smitten Kitchen says, Nix the sugar in the dough and halve the salt. Fill with pesto, cheese, ground nuts or olives, or any combination thereof. Brush the tops with additional egg wash and sprinkle with poppy or sesame seeds. Sounds delicious. My mouth is watering. I need more time to bake, man.
Homemade Pop-Tarts
From Smitten Kitchen
For the pastry
- 1 1/2 cups all-purpose flour
- 1/2 cup whole wheat flour
- 1 tbsp sugar
- 1 tsp salt
- 1 cup unsalted butter, cut into pats
- 1 large egg
- 2 tbsp milk
- 1 additional large egg (to brush on pastry)
For cinnamon filling
- 1/2 cup brown sugar
- 1 to 1 1/2 tsp ground cinnamon, to taste
- 4 tsp all-purpose flour
For jam filling
- 3/4 cup (8 ounces) jam
- 1 tbsp cornstarch + 1 tbsp cold water
Alternate fillings
- 9 tbsp chocolate chips, or
- 9 tbsp Nutella or other chocolate-hazelnut paste, or
- 9 tbsp of a delight of your choice, such as salted caramel or a nut paste
1. To make cinnamon filling: Whisk together the sugar, cinnamon, and flour.
2. To make jam filling: Mix the jam with the cornstarch/water in a small saucepan. Bring the mixture to a boil, and simmer, stirring, for 2 minutes. Remove from the heat, and set aside to cool. Use to fill the pastry tarts.
3. Make the dough: Whisk together the flour, sugar, and salt. Work in the butter with your fingers, pastry blender or food processor until pea-sized lumps of butter are still visible, and the mixture holds together when you squeeze it. If you’ve used a food processor, transfer the mixture to a large bowl. Whisk the first egg and milk together and stir them into the dough, mixing just until everything is cohesive, kneading briefly on a well-floured counter if necessary.
4. Divide the dough in half (approximately 8 1/4 ounces each), shape each half into a smooth rectangle, about 3×5 inches. You can roll this out immediately or wrap each half in plastic and refrigerate for up to 2 days.
5. Assemble the tarts: If the dough has been chilled, remove it from the refrigerator and allow it to soften and become workable, about 15 to 30 minutes. Place one piece on a lightly floured work surface, and roll it into a rectangle about 1/8″ thick, large enough that you can trim it to an even 9″ x 12″. Repeat with the second piece of dough. Set trimmings aside. Cut each piece of dough into thirds – you’ll form nine 3″ x 4″ rectangles.
6. Beat the additional egg and brush it over the entire surface of the first dough. This will be the “inside” of the tart; the egg is to help glue the lid on. Place a heaping tablespoon of filling into the center of each rectangle, keeping a bare 1/2-inch perimeter around it. Place a second rectangle of dough atop the first, using your fingertips to press firmly around the pocket of filling, sealing the dough well on all sides. Press the tines of a fork all around the edge of the rectangle. Repeat with remaining tarts.
7. Gently place the tarts on a lightly greased or parchment-lined baking sheet. Prick the top of each tart multiple times with a fork; you want to make sure steam can escape, or the tarts will become billowy pillows rather than flat toaster pastries. Refrigerate the tarts (they don’t need to be covered) for 30 minutes, while you preheat your oven to 350F.
8. Charming tip from King Arthur: Sprinkle the dough trimmings with cinnamon-sugar; these have nothing to do with your toaster pastries, but it’s a shame to discard them, and they make a wonderful snack. While the tarts are chilling, bake these trimmings for 13 to 15 minutes, till they’re golden brown.
9. Bake the tarts: Remove the tarts form the fridge, and bake them for 20 to 25 minutes, until they’re a light golden brown. Cool in pan on rack.
10. Do ahead: The sweet versions should keep at room temperature in an airtight container for a week. If you’d like to make them further in advance, I vote for freezing them unbaked between layers of waxed paper, and baking them as you need.

No comments:
Post a Comment