Showing posts with label bars. Show all posts

Wednesday, June 10, 2015

Strawberry Lemon Bars

It's been 3 weeks since my school year ended and my summer started. It's been nice to relax and not have to be anywhere all day but it's a good thing I'm taking a summer grad class and that I am getting ready to move or else I think I would go crazy from boredom! I recently accepted a job offer at a new school district to be closer to my family. I am getting too old to be doing 7-hour drives any longer. My new place cuts off only 2 hours, but that is still much more manageable for me. I start getting tired at about the 4th or 5th hour, so it's actually perfect.

I don't think it has hit me just yet that I will not be returning to the same school in August. My coworkers and I have gotten really close these last 2 years and I am sad to be leaving just when I think that things are going to change for the better. It didn't even hit me when we had our annual end-of-the-year faculty luncheon. The principal did her usual goodbyes and handed out cards and I was one of them this year, but still I didn't even tear up. It'll probably hit me when we're going back to school and there are no familiar faces. It'll be a difficult transition, but the staff members I met when I went for my interview were very nice. I've heard good things about the schools so I am also looking forward to this new chapter in my life!
1432760877836

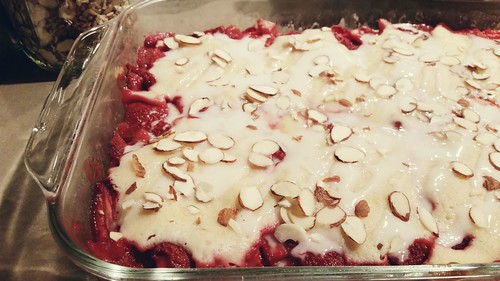
For our luncheon, we were asked to bring in a dessert and I made these Strawberry Lemon Bars. I think I had too much batter because the bars turned out a lot thicker than it looked like in the original post, but it still turned out great and it was all gone by the end! I think I made something with strawberries last year too. Probably because I had picked about 15 pounds of it last year around the same time, same as this year. Dealing with 15 pounds of strawberries every May is definitely becoming a tradition now.

Next pick-your-own fruit is peach! What should I make with peaches? Definitely canning is in the picture - jam and pie filling!

Strawberry Lemon Bars
From Mind Over Batter

For the macerated strawberries
1 1/2 to 2 pounds strawberries
4 tbsp sugar

For the bars
1 cup (2 sticks) unsalted butter, room temperature
2 cups sugar
1 tsp salt
4 eggs
1 1/2 tsp vanilla bean paste (I used extract)
2 lemons, zested and juiced
3 cups all purpose flour

For the glaze
1 cup powdered sugar
1 1/4 tsp vanilla extract
2 to 3 tbsp milk

Hull and slice the strawberries in half. Place in a large bowl and sprinkle sugar over the berries. Mix briefly with a spatula and set aside uncovered for about an hour or so. This will soften the berries and make them juicy.

Preheat the oven to 350F. Butter a 9x13 baking dish and line with parchment leaving a slight overhang (I skipped the parchment step as I would be serving right out of the dish). Set aside.

Using a hand mixer or a stand mixer on medium speed, cream the butter, sugar, lemon zest, and salt until light and fluffy, about 3 to 5 minutes. Add eggs on at a time, mixing well after each addition. Stop and scrape the mixer. Reduce speed to low and add the lemon juice and vanilla bean paste. Mix briefly to combine. Add the flour in two parts, mixing until just combined. Remove from mixer and give it another couple of folds to incorporate any dry bits on the bottom of the bowl. The batter is a bit stiff and not pourable.

Measure about 3 1/2 cups of batter and drop into prepared pan. Smooth and even out as best you can.

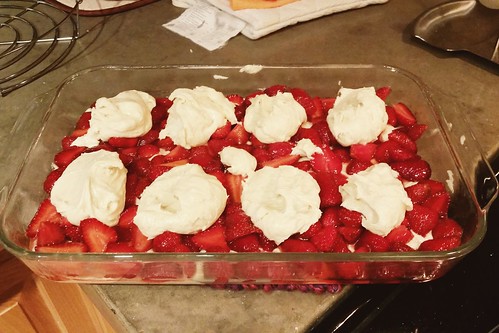
Take spoonfuls of macerated strawberries and drop them evenly into the pan. Drizzle 6 to 8 tablespoons of the strawberry juice. With a cookie scoop, drop remaining batter over the strawberries. No need to smooth it out - it will melt and come together in the oven.


1432760964249

Place pan in preheated oven and bake for 30 to 35 minutes until the top is golden brown and strawberries are bubbling. Remove pan from oven and allow to cool completely before glazing.

In a small bowl, combine the powdered sugar and vanilla extract. Add milk 1 tbsp at a time and mix until you get desired consistency. Once bars are cool, cut into squares (if you desire) and drizzle glaze over the bars. Top with a strawberry half if you desire.

Tuesday, November 5, 2013

Chewy Chocolate Chip Granola Bars

There's something about Quaker chewy granola bars that can get addicting but buying those every week can really start to add up. I tried to make some on my own before but it was too crumbly and I was disappointed so I gave into buying Quaker bars again. Now, however, I think I've found a recipe that will keep my wallet happy. It's not quite as chewy as the Quaker bars but it's still pretty darn good. If I baked it for less time, I think it'll be chewier and closer to what I'm looking for.

Chewy Chocolate Chip Granola Bars

It sure makes a lot of bars so it's lasted me several weeks now. It stays together pretty well and is a good balance of crunchy and chewy. I'm not a fan of granola bars that are so crunchy that my jaw ends up hurting by the end so this recipe makes even my jaws happy. Next time, I might add in some almonds for more protein and leave out the coconut as I don't know how much flavor that really added to the bars. Sorry, Quaker.

Chewy Chocolate Chip Granola Bars

Chewy Chocolate Chip Granola Bars
From This Week For Dinner

4 cups rolled old-fashioned oats
1 cup brown crisped rice cereal
1/3 cup whole wheat flour
1/2 cup shredded unsweetened coconut
1/3 cup brown sugar
1 cup mini chocolate chips
1/2 tsp kosher salt
2/3 cup canola or coconut oil
2/3 cup honey
1 tsp pure vanilla extract

Preheat oven to 325F.

Combine oats, crisped rice, flour, coconut, brown sugar, chocolate chips and salt. Mix well.

Combine oil, honey and vanilla. Whisk well. Add to dry ingredients and mix well (stir a lot!).

Line a 9x13 baking pan with parchment paper and pour granola bar mixture onto the lined baking pan. Press mixture out into a large, uniform rectangle. Bake for about 30 minutes until golden and dry to touch (watch out, it’s hot!).

Cool on the baking sheet for 10-20 minutes until completely cooled. Slide granola bar along with parchment paper onto a large cutting board. Cut into bars using a long serrated knife.

Makes 24 bars (8 rows, 3 columns). Bars will keep for several weeks in an airtight container.

Wednesday, February 27, 2013

Caramel Chocolate Pretzel Bark

When I started teaching, I got roped into buying for whatever fundraiser the students' sports teams or classes were doing. I've gotten a wallet from Thirty-One, discount cards for restaurants around town, and my favorite kind: food. Frozen cookie dough comes in handy when I want to bake rewards for students on weeknights so I get a couple tubs. Virginia Diner categories are fun to look through as there are always a lot of offers, especially around the holidays. This year I got some peanut brittle squares which are very good and next year, I look forward to getting something different (like the pecan turtles!)
  

Caramel Chocolate Pretzel Bark

Looking through the category though, I can't help wonder why I haven't tackled making the same things myself. I made it a goal of mine to make my own candies so when I saw how easy this recipe was, I went for it. I haven't gotten really reached my goal, but I think I'm well on my way. I've perfected homemade caramel with this bark recipe. I'm sure there's a more difficult way to make caramel to make it taste even dreamier, but I'm happy with the way this turned out. I love the combination of all the flavors and textures in this bark. I guess the only thing missing is peanut butter since peanut butter and chocolate make the best couple in the world!

Caramel Chocolate Pretzel Bark

This recipe makes a little less than 2 pounds of bark so it certainly makes a lot. I shared this with my students the other day and they loved it. Break this up into small pieces as it can be rich in just one small bite. Enjoy!

Caramel Chocolate Pretzel Bark
From Live Love Pasta

2 sticks of unsalted butter
1 cup light brown sugar
1 lb bag of mini pretzels (you won’t use the whole bag)
12 oz semi-sweet chocolate chips
Sea salt, for sprinkling on top

Preheat the oven to 400F. Cover an 11×17 baking sheet with aluminum foil. Place enough pretzels on the prepared baking sheet to form a single, even layer.

Melt 2 sticks of butter in a small saucepan over medium heat. Once the butter has melted, add the brown sugar and stir well to incorporate. Allow the brown sugar and butter to simmer and bubble, but do not let it boil. Stir the butter-sugar mixture occasionally. It should take about 3 minutes for the butter and sugar to caramelize, but keep a close eye on it because it will burn quickly.

When the sugar and butter have caramelized, pour the mixture evenly over the pretzels, strafing it back and forth down the length of the sheet. The caramel hardens quickly so it’s important to pour it as evenly and quickly as possible. If there are any clumps, use an offset spatula to spread the caramel as best you can. Bake for 5 to 7 minutes. Allow to cool completely.

Microwave chocolate chips in intervals of 30 seconds, stirring after each interval, until smooth. Pour the chocolate over the pretzel-caramel mixture, strafing it down the length of the baking sheet just as you did for with the caramel layer. Again, move evenly and quickly. Use an offset spatula to smooth out any clumps or thick spots. Sprinkle sea salt evenly over chocolate before it starts to harden. Allow the baking sheet to harden in the fridge for at least 1 hour.

When the bark has cooled and hardened, remove from the fridge and carefully pull the aluminum foil off the back. Break the bark into pieces and serve. Best stored in the refrigerator.

Thursday, March 29, 2012

Peanut Butter and Jelly Bars

Did you give up anything for Lent this year? I haven't given anything up for a couple years because I never followed through. I always tried to come up with things at the last minute so it would end up being something like no more sweets, but it never really meant anything. A student at the beginning of Lent told me that she gave up hot showers. That was something I had never heard of somebody giving up before, so I was impressed!

In addition to hot showers, however, she gave up sweets for Lent. That's why I felt bad handing out these Peanut Butter and Jelly Bars during class as she and another student had given up sweets. She had prepared for that day by making herself a peanut butter and jelly sandwich to pretend like she was eating the bars with the class. But as I folded back the foil to reveal these bars, sliced into them, and handed them to students, who bit into them and expressed joy at the combination of peanut butter, jelly, and milk in their mouths, she decided to have half a bar. I don't blame her.

Peanut Butter and Jelly Bars

If you also gave up sweets for Lent, I apologize for this post. But think of it this way: only two more weeks to go and you can make anything and everything you want! Just remember to bookmark this and go back to it after Easter.

Peanut Butter and Jelly Bars

I had just enough for all the students, so I didn't get to taste any except some of the crumbs. From what I hear, these bars are really good. Enjoy!

Peanut Butter and Jelly Bars
From Unfussy Fare

2 sticks (1/2 lb) unsalted butter, room temp
1 1/2 cups sugar
1 tsp vanilla extract
2 eggs, room temp
18 oz peanut butter [I used Jif's all natural creamy]
3 cups flour
1 tsp baking powder
1 1/2 tsp kosher salt
18 oz jam [I used strawberry]
2/3 cup salted peanuts, coarsely chopped

Grease and flour 9x13 glass pan.

Cream the butter and sugar with a mixer on medium speed until fluffy, two minutes. With the mixer on low speed, add vanilla, eggs, and peanut butter and mix until all ingredients are combined. Slowly add the flour, baking powder, and salt to the peanut butter mixture. Mix just until combined.

Spread 2/3 of the dough into the bottom of the prepared glass pan. Spread the jam evenly over the dough. Drop globs of the remaining dough over the jam. Don't worry if all the jam isn't covered. The dough will spread as it bakes. Sprinkle with chopped peanuts and bake for 45 minutes at 350F, until golden brown.

Cool and cut into squares.

Tuesday, September 13, 2011

Snickerdoodle Blondies

Back in August, the school's insurance company offered a free health risk assessment for the faculty. Basically, they take our blood, blood pressure, weight and height, etc to determine any health issues we need to watch out for. My results were pretty good. My risk of heart disease and diabetes are very low and my cholesterol levels were green, which is good. The only thing that really got me was my stress level, which was orange meaning caution.

The thing is, I found out that morning that we weren't supposed to eat 8 hours before this assessment so I was really worried that my results would be screwed. I had already eaten oatmeal and a banana by that time. But I am aware that I get stressed pretty easily so it's probably half-true. As much as I try not to appear so, I am inside and I tend to bottle it up. So how do I vent out a majority of this stress?

Snickerdoodle Blondies

By baking, of course. It's my outlet. Trying new recipes and sharing the delicious results with others just makes me so happy for at least that one moment. I end up stress baking. I knew that someone was allergic to chocolate (unfortunately!) and another was allergic to peanuts, so I just went with cinnamon. Everybody loves cinnamon and so everybody enjoyed these. I realized too late into making the batter that I actually don't have vanilla extract in my pantry, but they still turned out good. I think with the vanilla, it would have been excellent. I don't have a 9x13 baking pan in my apartment, so I baked the whole thing in a 9-inch circle pan and cut it into wedges. I would bake it for 30 minutes just to make sure the middle is cooked.

I don't know how much baking can balance out the stress that my job is giving me, but I'll keep it going just to make myself feel like it is!

Snickerdoodle Blondies

Snickerdoodle Blondies
From Budding Baketress

2 2/3 cups all-purpose flour
2 tsp baking powder
1 tsp salt
1 tsp cinnamon
1/4 tsp ground nutmeg
2 cups packed brown sugar
1 cup unsalted butter, at room temperature
2 eggs
1 tbsp vanilla extract
2 1/2 tbsp granulated sugar
2 tsp cinnamon

Preheat oven to 350F. Spray a 9x13-inch baking pan lightly with cooking spray.

In a medium bowl, whisk together the flour, baking powder, salt, cinnamon, and nutmeg. In the bowl of a stand mixer fittted with the paddle attachment, cream the butter and brown sugar on medium speed until light and fluffy, about 5 minutes. Add the eggs one at a time, beating well after each addition and stopping to scrape the bowl as necessary. Beat in the vanilla.

With the mixer on low, gradually add the flour mixture, beating just until combined. Transfer the dough to the prepared baking pan and spread in an even layer. Combine the granulated sugar and cinnamon in a small bowl and sprinkle evenly over the top of the batter.

Bake for 25 to 30 minutes, or until the surface of the blondies spring back when gently pressed. Remove the pan to a wire rack and let the blondies cool completely before cutting.

Tuesday, September 6, 2011

Salted Brown Butter Crispy Treats

When I studied abroad in Budapest (2 years ago now -- wow, how time flies), I had a professor who would give us chocolate whenever we had a test. He believed that chocolate gave us brain power so while we were trying to focus and concentrate on figuring out the answers, he would be handing out 3 to 4 pieces of chocolate. I had no problem with this. I love chocolate and especially European chocolate -- nom.

Salted Brown Butter Krispy Treats

I decided to do this with my Algebra 2 students. They had a test today and instead of handing out chocolate, I made them these Rice Krispy Treats. Last week, we had gone over a word problem involving cereal and it somehow led into a discussion about cereal bars, so it seemed fitting! I made two batches so I could share with some of the teachers as well. I'll have to try and keep this up as much as I can. Even though it was a 3-day weekend and I had all day Monday to make these, I think that soon I will be a little less busy and have time on Sundays to make more treats.

Salted Brown Butter Krispy Treats Salted Brown Butter Krispy Treats

You might be wondering what is so special about these Rice Krispy Treats. It's probably just like any other recipe out there, right? But it's not! First off, the recipe is from Smitten Kitchen so you know there's gotta be some delicious twist to it. Second, read the title. Salted. Brown Butter. I didn't understand what was so great about brown butter at first because I wasn't doing it correctly, but after making a couple more recipes with brown butter, I finally got that nice nutty color. Now I know why it makes anything extraordinary. And the salt. I love the sweet and salty combination. I don't know if I could ever eat plain ol' Rice Krispy Treats anymore. They all need to taste like this. I hope you enjoy these as much as I, my students, and my fellow teachers did.

Salted Brown Butter Krispy Treats

Salted Brown Butter Crispy Treats [Makes 16 2-inch squares]
From Smitten Kitchen

4 oz (1 stick) unsalted butter, plus extra for the pan
1 10-oz bag marshmallows
Heaping 1/4 tsp coarse sea salt
6 cups Rice Krispies cereal (about half a 12-oz box)

Butter (or coat with non-stick spray) an 8-inch square cake pan with 2-inch sides.

In a large pot, melt butter over medium-low heat. It will melt, then foam, then turn clear golden and finally start to turn brown and smell nutty. Stir frequently, scraping up any bits from the bottom as you do. Don’t take your eyes off the pot as while you may be impatient for it to start browning, the period between the time the butter begins to take on color and the point where it burns is often less than a minute.

As soon as the butter takes on a nutty color, turn the heat off and stir in the marshmallows. The residual heat from the melted butter should be enough to melt them, but if it is not, turn it back on low until the marshmallows are smooth.

Remove the pot from the stove and stir in the salt and cereal together. Quickly spread into prepared pan. I liked to use a piece of waxed or parchment paper that I’ve sprayed with oil to press it firmly and evenly into the edges and corners, though a silicon spatula works almost as well.

Let cool, cut into squares and get ready to make new friends.

Wednesday, July 20, 2011

Crispy Breakfast Bars

I got the official superintendent approval letter in the mail yesterday, so I can officially celebrate. But, I can't seem to bring myself to do it. I just get so anxious anytime I think about that first day. I want to make a good first impression and hope that I live up to everyone's expectations. But I should just stop worrying and start preparing myself. No point in wasting my energy in something that might actually make things worse!

I haven't been cooking much these days. My mom cooked a TON of the amazing Gamjatang (Korean Pork Bone Soup) and I've been eating it for lunch and dinner. Though my mom cooks mainly Korean food, I have a very clear memory of her making homemade Rice Krispie treats when I was a kid. The traditional gooey crunchy bar that is a favorite amongst all, young and old alike. Nowadays, they've gone modern and updated everything. There are not only new flavors for the Rice Krispie treats, but also other cereal bars. But ignoring the fact that I don't know what most of the ingredients are, I still can't bring myself to grab one off the shelf because they're sweeter and pricier than I'd like. How easy is it to make more bars than they give you in the box for a pocket-friendlier price?

Crispy Breakfast Bars

This recipe originally uses puffed cereal, but I wanted to use Cheerios, so they didn't quite live up to the "crispy" part of the name. I still liked the overall taste. I recently fell in love with almond butter, so this recipe was a plus with just the ingredient list. I would have liked to use honey, but I actually don't have it in the house (weird--we always keep it in the pantry... I guess it needs to be winter?) so I used light corn syrup. My dad thought these weren't sweet enough, but I thought it was perfect. Of course, the sweetness will differ depending on which cereal is used. I would like to change it up and see what other kinds of cereal I can made these out of.

Crispy Breakfast Bars

Anytime I bit into the peanuts, I thought about the Peanut Bars made by Lance. I love those things. I think I should try making those at home too.

Crispy Breakfast Bars

Crispy Breakfast Bars
From Vegetarian Times

7 cups puffed whole grain cereal (I used Cheerios)
1 1/2 cups combo of dried cranberries, raisins, or dried blueberries (I used a raisin nut mix)
1 tsp ground cinnamon
3/4 cup brown rice syrup or honey
3/4 cup almond butter
2 tbsp soy margarine or butter

Stir together cereal, dried fruits and cinnamon in large bowl.

Place syrup, almond butter and soy margarine in large, microwave-safe measuring cup. Microwave 1 1/2 minutes on high, or until hot and margarine has melted. Stir well, then pour over cereal mixture. Stir to coat.

Dampen hands with cold water. Press cereal mixture firmly into 9x9-inch square baking pan, re-wetting hands if necessary to keep mixture from sticking. Freeze 30 minutes. Cut into 15 bars, and store in refrigerator.

Sunday, July 3, 2011

Thick Chewy Granola Bars

Today is the birthday of my (former) housemate who lives in California. I decided to surprise her. Unfortunately, not by hopping on a plane and arriving at her doorstep. I took a less expensive route and surprised her with a package at her doorstep.

Thick Chewy Granola Bars

I know that she would love sweets, but first of all, I don't think sending a cake through the mail is really ideal, and second, I didn't want her to call me evil again! (Joke. I'm really not evil. So maybe I just aid and abet others in eating way too many sweets by baking too much.) This girl has been horseback riding ever since she was little and now that she's home, she gets to spend a lot of time with her horses. She needs something to keep her energy up. Granola bars are the perfect grab-and-go snacks, so I sent her some homemade bars along with a cute card. I sent them on Tuesday and they got there July 1! What with July 4 tomorrow, I didn't want anything to happen so that she received them late. Better early than late.

Thick Chewy Granola Bars Thick Chewy Granola Bars

There are so many granola bar recipes to choose from. They all sound really good! And really, it's a matter of your own tastes and you never end up making the same bars twice. Smitten Kitchen has never let me down, so I stuck with her recipe. While this is a really good granola bar, it's not the kind I like. I like the crispy and crunchy ones that require me to chew so much that I can feel it in my jaw afterwards. But the balance of flavors in these bars is delicious. I used the least amount of sugar required and it was the perfect level of sweetness. If you don't like chewing until your jaw hurts, go for these. I think what gives these a kind-to-your-jaw chewiness is using quick oats and oat flour.

Thick Chewy Granola Bars

Impatience always gets the best of me. I should have waited a bit longer to cut into these, but I didn't and they ended up crumbling a bit. I was at least still able to wrap each bar individually. I got 9 bars out of this recipe. Twelve seemed a little too small and 8 seemed like too much, so 9 was just right!

Thick Chewy Granola Bars

Thick Chewy Granola Bars
From Smitten Kitchen

- 1 2/3 cups quick rolled oats
- 1/2 to 3/4 cup granulated sugar (more for a sweetness akin to most purchased bars; less for a mildly sweet bar)
- 1/3 cup oat flour (or 1/3 cup oats, finely ground in a food processor or blender)
- 1/2 tsp salt
- 1/4 tsp ground cinnamon
- 2 to 3 cups dried fruits and nuts (total of 10 to 15 ounces)
- 1/3 cup peanut butter or another nut butter (I used almond butter) (optional)
- 1 tsp vanilla extract (optional)
- 6 tbsp melted butter
- 1/4 cup honey, maple syrup or corn syrup [I used maple syrup]
- 2 tbsp light corn syrup (see Note above)
- 1 tbsp water

1. Line an 8x8 pan in one direction with parchment paper, allowing it to go up the opposing sides to create "handles." Lightly grease the parchment paper and the exposed pan, or coat with a non-stick spray.
2. Stir together quick oats, sugar, oat flour, salt, cinnamon, and the dried fruits and nuts. In a separate bowl, whisk together the vanilla, melted butter, maple syrup, corn syrup, and water. Toss the wet ingredients with the dry (and peanut butter, if you’re using it) until the mixture is evenly crumbly. Spread in the prepared pan, pressing them in firmly to ensure they are molded to the shape of the pan. (A piece of plastic wrap can help with this, as you press down on the back of it.)
3. Bake the bars at 350F for 30 to 40 minutes, until they’re brown around the edges — don’t be afraid to get a little color on the tops too. They’ll still seem soft and almost underbaked when you press into the center of the pan but do not worry, they’ll set completely once completely cool.
4. Cool the bars in their pan completely on a cooling rack. (Alternately, after about 20 minutes you can use your parchment “sling” to lift and remove the bars, and place them in their paper on the rack to cool the rest of the way. This can speed the process up.)
5. Once cool, a serrated knife (or bench knife) to cut the bars into squares. [Updating to note, as many had crumbling issues:] If bars seem crumbly, chill the pan of them further in the fridge for 30 minutes which will fully set the “glue”, then cut them cold. To store, wrap the bars individually in plastic or stack them in an airtight container. In humid weather, it’s best to store bars in the refrigerator. They also freeze well.

Wednesday, August 4, 2010

White Chocolate and Chocolate Chip Blondies

The summer school I volunteer at has SAT prep classes and regular Math and English classes for middle school students. While the SAT students have classes until the official test in October, the other students had their last day on Monday and their final exams today. In celebration of the end of summer school for the middle school students, I decided to bake. Because I didn't want to go insane from baking cookies for 50 people with just one cookie sheet, I went for bars. Plus, I'd rather look through 300+ bookmarks of bars than 800+ of cookies on my Delicious account. Saved.

As I wanted to keep things simple, this blondies recipe was perfect. Just make the batter, then throw in some chocolate chips. Actually, these bars are FULL of chocolate chips. Only fair, as every bite should have some. I doubled the recipe for a quicker baking process, but used just 1/2 cup white sugar and 1 cup brown sugar since the chocolates would make things sugar-y enough. These bars were so well received, some students were jumping for seconds. And I had to stop others from taking their fourth pieces as I told them they've had enough sugar for today. I'm glad they liked it that much!

White Chocolate and Chocolate Chip Blondies

White Chocolate and Chocolate Chip Blondies [Makes 16 bars]
From Judicial Peach

- 1/2 cup white sugar
- 1/2 cup brown sugar
- 1/4 cup butter, softened
- 2 large egg whites [I used 1 whole egg]
- 1 tsp vanilla extract
- 1 1/4 cup flour
- 1/2 tsp baking powder
- 1/2 tsp salt
- 1/2 cup white chocolate chips
- 1/2 cup chocolate chips

1. In a medium bowl, cream the butter and sugars until well blended. Add the egg and vanilla, and mix until fully incorporated.
2. Sift together the flour, baking powder, and salt. Working in batches, add the flour mixture to the sugar mixture. Mix until just incorporated. Add 1/4 cup of each chocolate chip, and mix into the batter.
3. Grease an 8x8-inch baking pan. Spread the batter evenly into the baking pan. Sprinkle the remaining 1/2 cup of chocolate chips evenly on top of the mixture. Bake at 350F for 25 minutes, or until a toothpick comes out clean. Allow the blondies to cool in the pan on a wire rack.

Sunday, June 27, 2010

Cherry Crumb Bars

Finally! A day to myself. I've been working from 10 to 7 every day so I haven't had time to cook real meals for myself or bake at all! Ridic. It'll be a lot better from now on (hopefully) because there was a lot of preparation that had to be done for the start of classes tomorrow. So today, I got up and started baking right away. I've been searching for a recipe with cherries all week because I still had some left from last week. Whole Foods had a sale and of course I had to buy! But they didn't taste as great as I had expected so after finishing off the first bag, I saved the second for baking. I finally decided on these Cherry Crumb Bars from Cafe Fernando.

By the way, I think before I even buy cherries again, I will pick up a cherry pitter. Yeah.

I followed the recipe exactly, but next time, I might cut down on the sugar a bit. It wasn't overly sweet, but it could definitely use less. And maybe push the cherries down a bit instead of just placing them on top of the cake batter.

Cherry Crumb Bars

For the crumb topping:
- 1 1/4 cup flour
- 1/2 cup + 2 tbsp sugar
- 1/4 tsp salt
- 6 tbsp butter, cold and cut into small cubs

For the cake:
- l pound (2 1/2 cups) cherries, pitted
- 1 cup flour
- 1/2 tsp baking powder
- 1/4 tsp salt
- 1/2 cup unsalted butter
- 1 cup powdered (confectioners') sugar
- 2 eggs
- 1 tsp vanilla extract

1. Preheat your oven to 350 degrees F. Prepare a baking pan (9-inch square or what I used, a 7x11) by lining it with parchment paper, leaving a bit extra on the sides for easy removal of cake from pan.
2. To make the crumb topping, mix flour, sugar and salt in a food processor. Add cold butter to the flour mixture and pulse until the butter cubes are pea-sized and coated with flour. Do not let the dough come together in a ball. Refrigerate until ready to use.
3. To make the cake, whisk flour, baking powder, and salt in a bowl and set aside. In another bowl, beat butter and confectioners’ sugar until light and fluffy; beat in eggs, one at a time. With mixer on low, beat in vanilla, then flour mixture.
4. Spread batter in prepared pan. Sprinkle with pitted sour cherries and top with the crumb topping.
5. Bake for 40 to 45 minutes, or until the crumbs are golden and a thin knife inserted into the center comes out clean. Let cool completely in pan. Remove cake from pan and cut into 16 bars.

Cherry Crumb Bars
Cherry Crumb Bars
Cherry Crumb Bars

Uh, mine definitely did not turn out as pretty, but I think it was still tasty. (It also made me feel better as I was watching England lose to Germany - see, baking cures.) The cherry provides a nice tart, juicy flavor, while the crumbs and the soft cake bottom was a nice contrast of texture. Now to see if my parents like it. They are usually my taste-testers and the only ones that are here to eat my baked goods anyway.