Showing posts with label yeast. Show all posts

Friday, November 28, 2014

"Amish" Dinner Rolls

Have you ever been to Logan's Roadhouse? The one here in town is right next to a movie theater so one time, my boyfriend and I ate dinner there before going to see a movie. He claimed that the rolls were really good because they're so light and fluffy and big and I agreed with him the first time I ate there. Then the second time around, things weren't so great. I remember being pretty disappointed with all of the food that night, including the famous rolls! Well, here's a rolls recipe that will NOT disappoint you for sure.

"Amish" Dinner Rolls

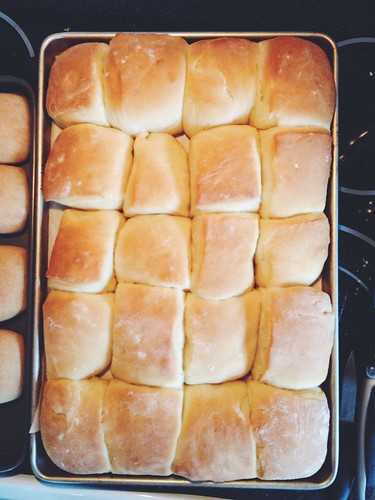
These are also light and fluffy and a little sweet. I didn't brush butter on top of these but I think they taste better than any restaurant roll that I've ever tasted. It's also easy to make. The recipe says it makes 24 rolls but I made 20. If I had known that they were going to rise this much, I would've made even more rolls out of one batch. One roll about almost 2 inches tall and 5 inches across. The sizes are varying but that's the great thing about homemade anything. Each roll unique in its own way. I would like to try making this again with half whole wheat flour and half bread flour as one commenter did but just bread flour was delicious. The dough may seem too sticky to work with after the first kneading but after it rises and you are kneading it a second time but this time on a floured surface, it is easy and smooth to work with.

These rolls would be great to have for dinner with some soup or a nice pasta dish. They are also great for holiday dinners such as Thanksgiving or Christmas. Make these and take them to your next family gathering. It is sure to be a hit!

"Amish" Dinner Rolls
From Friendship Bread Kitchen

1 cup Amish Friendship Bread Starter
1 1/2 cups warm water
1/4 cup honey (or sugar)
1 tsp yeast
1/4 cup oil
2 eggs
1 tsp salt
3 tbsp vital wheat gluten (omit if using bread flour)
About 6 cups whole wheat flour (or bread flour)

In a stand mixer bowl, stir together warm water, honey, and yeast. Let sit for about 10 minutes.

Next, add starter, oil, eggs, salt, wheat gluten, and 4 cups of the flour and mix. Gradually add remaining flour until the dough pulls away from the side of the bowl. While dough is in the mixing bowl, knead for about 8 to 10 minutes. By the time the kneading is over, the sides of the bowl should be clean.

Oil bottom and sides of a large bowl. Put dough into bowl and cover. (Let rise in the mixer bowl.) Let dough stand about three hours (or until doubled) at room temperature.

Finally, punch dough down and divide into three equal balls. On a floured surface, knead each ball. After kneading each ball, pat out until about ½-inch thick. Grease a large cookie sheet. Use pizza cutter to cut out in rectangular shapes and place on greased cookie sheet to continue the rise. Cover and let stand about two hours or until risen.

Preheat oven to 350° F (175° C). Bake 12-15 minutes.

Wednesday, April 11, 2012

Sour Cream Buns

For almost a full week during my Spring Break, I'll be staying in Lexington. Not all that unusual because I am here almost every weekend, but this time, instead of just the two of us or the three of us, there are four of us! Us = ex-housemates. Sadly, one girl couldn't make it out, so it's not 100%, but we'll have to do this again and make sure she comes out next time!

I got here Monday late morning and spent the evening doing an Easter Egg Hunt. A day late, but still a lot of fun. For the third annual egg hunt, there were 106 eggs and seven hunters. I managed to get second place (yay!) and won a chocolate bunny that was "born to hunt" (according to its hat). I won the first annual egg hunt, but I've been getting second place after that. I guess I need to work more on my training!

Sour Cream Bunny Buns

To share with my competitors, I made bunny shaped buns. The first batch I made, I cut the ears the wrong way. Instead of cutting the ears from behind, I cut them from the front, but either way they looked more like cats or Pikachu rather than bunnies. People still got it and thought bunnies right away. Of course, you don't have to make the ears so that they resemble bunnies. Just shape them into rolls, place them in a 9x13 baking pan, and bake.

Sour Cream Bunny Buns Sour Cream Bunny Buns

I didn't want to make Hot Cross Buns again and these were easy to make. I'm really glad I made these because these buns are DELICIOUS. Somebody asked if I made these out of croissant dough, but the only thing different from regular dough is the sour cream. But it does taste like croissant dough and it reminds me of bread that I would buy from the Asian bakeries back home. I definitely need to make these for my parents when I'm home again because they will enjoy these. Oh, I think I just got an idea for Mother's Day... :)

Sour Cream Buns
From Kirbie Cravings

2 1/2 to 3 cups all-purpose flour
2 tbsp sugar
1 package (1/4 ounce) active dry yeast
1 tsp salt
1 cup (8 ounces) sour cream
1/4 cup water
2 tbsp butter
1 egg

In a large bowl, combine 1 1/2 cups flour, sugar, yeast and salt.

In a small saucepan, heat the sour cream, water and 2 tbsp butter to 120°-130°; add to dry ingredients. Beat on medium speed for 2 minutes. Add egg and 1/2 cup flour; beat 2 minutes longer. Stir in enough remaining flour to form a soft dough.

Turn onto a floured surface; knead until smooth and elastic, about 6-8 minutes. (I used my stand mixer with the dough hook attachment.) Place in a greased bowl, turning once to grease the top. Cover and let rise in a warm place until doubled, about 1 hour.

Punch dough down. Turn onto a lightly floured surface; divide into 24 pieces. Shape each into a smooth oval. Try to make one side slightly thinner for the head. Taking a pair of kitchen sheers, make two cuts on the top of the dough to form ears. Place bunnies on baking sheet lined with parchment paper. Cover and let rise until doubled, about 30 minutes.

Bake at 375F for about 10 minutes or until golden brown.

Monday, April 9, 2012

Hot Cross Buns

Happy Easter! Yesteday, I actually went to church as my carpool buddy had invited me to her's. After church, I went over to her house with her family where we had a great Easter lunch. It turned out to be a very Thanksgiving-like menu, but still tasted very good. For dessert, I made Hot Cross Buns.

Last year, I had also made Hot Cross Buns, but it didn't turn out well. Inexperienced with yeast, I made a lot of mistakes and the bread ended up dense and tough, though it did have tasty flavors. I went for a different recipe this time, but I still made a mistake. So the recipe says to use 4 tsp allspice. It seemed like a lot, but it didn't seem too bad when I mixed it with the flour, but then the dough ended up a light brown color instead of being a regular dough color. Yeah, definitely too much allspice. I guess I technically didn't make a mistake, but I should have followed my instinct and used less allspice. Fresh out of the oven, these buns were so soft and tender.

Hot Cross Buns

Next year, I might try another recipe or I might combine this year's and last year's recipes. Instead of just raisins, I might do half dried cranberries. Instead of just lemon zest, maybe I'll add orange zest too. Definitely need to watch out for the allspice! I'm not sure what amount would work best, but I'm also not a fan of allspice so maybe 1/4 to 1/2 tsp would work. Well, I've got plenty of time to think about that...

Hot Cross Buns

Hot Cross Buns
From Adventuress Heart

2 1/4 tsp active dry yeast
3 to 3 1/2 cups unbleached all-purpose flour
4 tbsp butter, softened
3/4 cup warm milk (100F)
1/4 cup sugar
2 eggs
1 tsp cinnamon
1/2 tsp nutmeg
4 tsp allspice
1 tsp salt
1 cup raisins
1 tbsp lemon zest
1 egg whisked with 1 tsp water
1 tsp milk and 3 - 4 tbsp powdered sugar

Heat milk to 100º F and dissolve yeast in milk for 10 minutes, until mixture is foamy.

Meanwhile, mix 3 cups of flour, sugar, spices, zest and salt in a stand mixer. Add yeast mixture and mix until combine. Add eggs one at a time until combined. Add softened butter. Mix until dough is smooth and elastic. Add remaining flour if dough is too sticky. Knead dough by hand and mix in dried fruit.

Shape dough into a ball and place in a lightly greased bowl. Cover with plastic wrap and let rise until doubled, about 2 hours.

Punch down risen dough and divide into 12 equal pieces, rolling each piece into a ball. Place dough pieces on a parchment paper-lined baking sheet about 1-inch apart. Cover with plastic wrap and let rise another two hours.

Preheat oven to 375F. Remove plastic wrap from buns and score the tops of each bun with a cross shape, about 1/4-inch deep. Brush the tops with egg wash and bake for 15 minutes or until deep golden brown.

Allow to cool completely before drizzling a cross shape with glaze on the tops of each bun.

Saturday, July 23, 2011

Chewy Pretzel Bites

Yesterday, my mom and I took a trip down to Roanoke for apartment hunting. The school I'll be teaching at for the next year is in a small town, but I knew I'd prefer living in a bigger city. I considered living in my old college town, as it is only an hour away, but I didn't think I'd really enjoy commuting every morning on either I-81 or the really zig-zaggy hill roads. Roanoke is 20 minutes closer (a 40-minute drive) and there's much more to do in the city. It's time for a change of scenery.

I was supposed to take tours of 5 places, but only saw two. Rooms are filling up really fast and if I don't act within a day of an opening, it's someone else's. The second place my mom and I checked out felt stuffy and it was pretty dark, so I wouldn't get much sunlight. But the first building, I fell in love with. It's an old building that's been remodeled for residential purposes set to open this summer, so everything's completely new. It's also a historic landmark and in a great location. Hopefully, everything will work out and I will get that place.

Our plan for this trip was drive down, see the places, and drive back up the same day. We didn't think we'd have time to stop anywhere for lunch as we needed to arrive in Roanoke on time. (We were able to stop for dinner as we were done with apartment tours earlier than expected.) So I packed us a cold chicken pasta salad and made some pretzel bites as snacks for the road.

Chewy Pretzel Bites Chewy Pretzel Bites

I don't know why I wanted to make these pretzels when it was 100F outside, but I did. It was worth it though. It was my first time making anything pretzel so when I bit into a piece, I was just really amazed it actually had that pretzel taste. I didn't think there was enough of it though. Maybe it's because the dough is only dipped into a baking soda bath and not boiled in it. Next time, I'd like to try making some with a harder exterior, but these softer ones are probably better for the jaw.

Chewy Pretzel Bites Chewy Pretzel Bites

Chewy Pretzel Bites [Makes about 2 dozen bites]
From Mel's Kitchen Cafe

*Note: if using active dry yeast, increase the yeast to 1 tablespoon. Proof the yeast in the warm water and sugar (let it bubble and foam – maybe about 5 minutes) before adding it to the flour and salt.

2 1/2 cups (10 1/2 oz) all-purpose flour
1/2 tsp salt
1 tsp sugar
2 1/4 tsp instant yeast
1 cup (8 oz) very warm water

1/2 cup (4 oz) warm water
2 tbsp baking soda
Coarse salt (optional)
3 tbsp butter, melted

In a large bowl or the bowl of an electric mixer, place the flour, salt, sugar and yeast. Mix to just combine. Add the water and mix well, adding more flour, as needed, a bit at a time to form a soft, smooth dough that clears the sides and bottom of the bowl. Knead the dough, by hand or machine, for about 5 minutes, until it is soft, smooth and quite slack. The goal is to get a really soft dough that isn’t overly sticky. Lightly flour the dough and place it in a plastic bag; close the bag, leaving room for the dough to expand, and let it rest for 30 minutes or up to 60 minutes.

Preheat your oven to 500F. Don’t be afraid of the high heat! This is what will help those pretzels to brown up perfectly and stay soft on the inside. Prepare two baking sheets by lining them with parchment paper or lightly greasing them.

Transfer the dough to a lightly greased work surface, and divide it into about four strips of equal length. Allow the pieces to rest, uncovered, for 5 minutes. While the dough is resting, combine the 1/2 cup warm water and the baking soda in a liquid measuring cup (deep enough to dip the pretzel bites into). Make sure the baking soda is thoroughly dissolved. Sometimes I have a hard time getting the baking soda completely dissolved, so I just lightly stir up the mixture right before adding each pretzel.

Cut each strip of dough into about 6 to 8 pieces, about 1 to 1 1/2 inches in width. You don’t have to be completely exact, just eyeball it. Dip each pretzel bite in the baking soda solution (this will give the pretzels a nice, golden-brown color), and place them on the baking sheets. Sprinkle them lightly with coarse, kosher, or pretzel salt. Allow them to rest, uncovered, for 10 minutes.

Bake the pretzels for 7 to 8 minutes or until they’re golden brown. Bake one sheet at a time – it won’t hurt the other pretzels to chill out for a little longer.

Remove the pretzels from the oven, and brush them thoroughly with the melted butter. Keep brushing the butter on until you’ve used it all up; it may seem like a lot, but that’s what gives these pretzels their ethereal taste. Eat the pretzels warm, or reheat them in an oven or microwave on low heat.

Monday, July 18, 2011

Lemon Pull-Apart Coffee Cake

The Cinnamon Sugar Pull-Apart Bread was such a success that I knew I needed to make the lemon version to see how that would taste. It finally happened after much delay.

Lemon Pull-Apart Coffee Cake Lemon Pull-Apart Coffee Cake

The method of making the dough was different this time. Instead of adding all of the flour in at once, I reserved some to be put in towards the end after the wet ingredients have been mixed in. I've seen this method on other blogs even for the cinnamon sugar version and thought it wouldn't make a difference. I don't think it showed in the end result, but I liked adding flour that wasn't more than necessary after adding the wet ingredients.

Lemon Pull-Apart Coffee Cake Lemon Pull-Apart Coffee Cake

Look at how much is gone within 12 hours! It's that good. Not overly sweet, not overly citrus-y. A great balance of refreshing flavors. The cream cheese glaze adds a nice tangy kick to each bite. Again, I don't have a stand mixer with dough paddle or anything, but was still able to make this cake. My arm just got a nice workout.

Lemon Pull-Apart Coffee Cake

Specks of zest throughout. Delicious. I didn't have oranges, so I left out the orange zest, but still great. I noticed that 30 minutes wasn't enough when I baked the cinnamon sugar version the first around as the inside was still doughy, so I baked for 5 more minutes and it was perfect! Make sure you cover the bread with foil though so that the top doesn't burn.

Lemon Pull-Apart Coffee Cake
From Leite's Culinaria

For the sweet yeast dough
2 3/4 cups (12 1/4 oz) all-purpose flour
1/4 cup (1 3/4 oz) granulated sugar
2 1/4 tsp (1 envelope) instant yeast
1/2 tsp salt
1/3 cup (2 1/2 fl oz) whole milk
2 oz unsalted butter
1/4 cup (2 fl oz) water
1 1/2 tsp pure vanilla extract
2 large eggs, at room temp

For the lemon paste filling
1/2 cup (3 1/2 oz) granulated sugar
3 tbsp finely grated lemon zest (3 lemons)
1 tbsp finely grated orange zest
2 oz unsalted butter, melted

For the tangy cream cheese icing
3 oz cream cheese, softened
1/3 cup (1 1/4 oz) powdered sugar
1 tbsp whole milk
1 tbsp fresh lemon juice

Stir together 2 cups (9 oz) of flour, sugar, yeast, and salt in a bowl of a stand mixer; set aside. In a small saucepan, heat the milk and butter over low heat just until the butter is melted. Remove from heat, add the water, and set aside until warm (120F to 130F), about 1 minute. Add vanilla extract.

Pour milk mixture over flour-yeast mixture and, using a rubber spatula, mix until the dry ingredients are evenly moistened. Attach the bowl to the mixer, and fit the mixer with the paddle attachment. With the mixer on low speed, add the eggs, one at a time, mixing after each addition just until incorporated. Stop the mixer, add 1/2 cup (2 1/4 ounces) of the remaining flour, and resume mixing on low speed until the dough is smooth, 30 to 45 seconds. Add 2 more tbsp flour and mix on medium speed until the dough is smooth, soft, and slightly sticky, about 45 seconds.

Sprinkle a work surface with 1 tbsp flour and center the dough on the flour. Knead gently until smooth and no longer sticky, about 1 minute, adding an additional 1 to 2 tablespoons flour only if necessary to lessen the stickiness. Place the dough in a large bowl, cover the bowl securely with plastic wrap, and let the dough rise in a warm place until doubled in size, 45 to 60 minutes. Press the dough gently with a fingertip. If the indentation remains, the dough is ready for the next step.

While the dough is rising, make the filling. In a small bowl, mix together the sugar and the lemon and orange zests. Set the sandy-wet mixture nearby (the sugar draws out moisture from the zests to create the consistency).

Center a rack in the oven and preheat the oven to 350F. Lightly butter a 9-by-5-by-3-inch loaf pan. Or, lightly coat the pan with nonstick spray. Gently deflate the dough. On a lightly floured work surface, roll out the dough into a 20-by-12-inch rectangle. Using a pastry brush spread the melted butter generously over the dough. Cut the dough crosswise into 5 strips, each about 12 by 4 inches. (A pizza cutter is helpful here.) Sprinkle 1 1/2 tbsp of the zest-sugar mixture over one of the buttered rectangles. Top with a second rectangle and sprinkle it with 1 1/2 tbsp of the zest-sugar mixture. Repeat with the remaining dough rectangles and zest-sugar mixture, ending with a stack of 5 rectangles. Work carefully when adding the crumbly zest filling, or it will fall off when you have to lift the stacked pastry later.

Slice the stack crosswise through the 5 layers to create 6 equal strips, each about 4 by 2 inches. Fit these layered strips into the prepared loaf pan, cut edges up and side by side. Loosely cover the pan with plastic wrap and let the dough rise in a warm place until puffy and almost doubled in size, 30 to 50 minutes. Press the dough gently with a fingertip. If the indentation remains, the dough is ready for baking.

Bake the coffee cake until the top is golden brown, 30 to 35 minutes. Transfer to a wire rack and let cool in the pan for 10 to 15 minutes.

Meanwhile, make the cream cheese icing. In a medium bowl, using a rubber spatula, vigorously mix the cream cheese and sugar until smooth. Beat in the milk and lemon juice until the mixture is creamy and smooth.

To remove the coffee cake from the pan, tilt and rotate the pan while gently tapping it on a counter to release the cake sides. Invert a wire rack on top of the coffee cake, invert the cake onto the rack, and carefully lift off the pan. Invert another rack on top, invert the cake so it is right side up, and remove the original rack. Slip a sheet of waxed paper under the rack to catch any drips from the icing. Using a pastry brush, coat the top of the warm cake with the icing to glaze it. (Cover and refrigerate the leftover icing for another use. It will keep for up to 2 days.)

Serve the coffee cake warm or at room temperature. To serve, you can pull apart the layers, or you can cut the cake into 1-inch-thick slices on a slight diagonal with a long, serrated knife. If you decide to cut the cake, don’t attempt to cut it until it is almost completely cool.

Wednesday, June 22, 2011

Cinnamon Sugar Pull-Apart Bread

What is it about cinnamon and sugar that makes it such a heavenly mixture?

Cinnamon Sugar Pull-Apart Bread

There was a church gathering at our house Sunday night and I provided the dessert, as always. As soon as my mom brought this pull-apart bread to the table, everyone dived in. The sweet cinnamon-y taste between thin layers of soft bread will win over anybody's heart. I made two loaves and when it was all gone, people kept asking for more, despite the fact that we had about one-third of a chocolate chip bundt cake left that a guest brought.

Cinnamon Sugar Pull-Apart Bread

I know there is a lemon version of this bread, so I'm going to try that another time. I didn't use all of the cinnamon sugar mixture and it was fine, but if you like things sweet, then go for it. I also don't have a stand mixer with a dough attachment (or a stand mixer with a regular attachment for that matter), but I just used a fork to mix the dough together.

Cinnamon Sugar Pull-Apart Bread Cinnamon Sugar Pull-Apart Bread

This time last year, I wouldn't have thought about making this. First of all, it involves yeast, something that I was so irrationally afraid of working with. Second, it's complicated. It involves rolling out dough and kneading and browning butter... Either I was lazy or I was just inexperienced with baking that such a long recipe seemed daunting (I'm gonna go with the latter). After a year of some fantastic adventures in the kitchen, I'm amazed at how much I've learned. Now, I look at a recipe like this and I am excited. I'm motivated to challenge myself and have fun. I've still got a lot to learn (especially about food photography), but I look forward to whatever experience I gain from it all. So happy birthday to you, food blog o' mine. And thanks to all the readers of this blog. It truly means a lot!

Cinnamon Sugar Pull-Apart Bread Cinnamon Sugar Pull-Apart Bread

Cinnamon Sugar Pull-Apart Bread [Makes 1 9x5 loaf]
From Annie's Eats

- 2 3/4 cups all-purpose flour, plus more as needed
- 1/4 cup granulated sugar
- 2 1/4 tsp instant yeast
- 1/2 tsp salt
- 4 tbsp unsalted butter
- 1/3 cup whole milk
- 1/4 cup water
- 1 tsp vanilla extract
- 2 large eggs

For the filling
- 4 tbsp unsalted butter
- 1 cup sugar
- 2 tsp ground cinnamon
- 1/2 tsp freshly grated nutmeg

1. To make the dough, combine the flour, sugar, yeast and salt in the bowl of a mixer fitted with a dough hook. Combine the butter and milk in a small saucepan and heat just until the butter is melted. Set aside and let cool briefly, until the mixture registers 115-125F on an instant-read thermometer. Add the milk mixture, water, vanilla and eggs to the dry ingredients. Mix on low speed until a cohesive dough forms. Continue to knead until smooth and elastic, adding additional flour as needed 1 tablespoon at a time until the dough clears the sides of the bowl and is tacky but not sticky. Knead about 3 to 5 minutes. Transfer the dough to a lightly oiled bowl, turning once to coat, and cover. Let rise in a warm place until doubled in bulk, about 1 hour. (After the dough has doubled, it can be wrapped in plastic wrap and refrigerated overnight. Let stand at room temperature 30 minutes before proceeding.)
2. While the dough rises, add the butter to a small saucepan and melt until browned. Set aside. Combine the sugar, cinnamon and nutmeg in a small bowl and mix well.
3. Transfer the dough to a lightly floured work surface and gently deflate. Roll into a ball, cover with a clean towel and let rest for 5 minutes. Roll the dough out into an approximately 12x20-inch rectangle.
4. Brush the dough with the browned butter. Sprinkle the cinnamon-sugar mixture over the dough in an even layer.
5. Lightly grease a 9 x 5-inch loaf pan. Slice the dough vertically into 6 even strips. Stack the strips on top of each other and again cut again into 6 equal slices. Stack all the squares on top of each other and set into the prepared loaf pan. Cover loosely with a kitchen towel and let rise in a warm place, 30 to 45 minutes.
6. Preheat the oven to 350F. Transfer the loaf to the oven and bake 30 to 35 minutes, until the top is golden brown. (If the top seems to be browning too quickly, cover loosely with foil at the end of baking.) Remove from the oven and let rest in the pan 20 to 30 minutes. Run a knife around the edges of the pan to loosen and carefully turn the loaf out, transferring to a serving plate. Serve warm.

Sunday, April 24, 2011

Croation Easter Cake

I love the idea of traditions. My family and I have a few of our own, but most of them don't really involve food, especially baked goods. Now that I've become more active in the kitchen, I've been wanting to start new ones. At Thanksgiving dinner, I decided that the stuffing I made last year must become a tradition. Everyone loved the dish and I can't imagine another stuffing recipe that would satisfy my parents. For future Christmas dinners, I am on a mission to make the perfect Bûche de Noël so it'll become a tradition. A few weeks before Easter, I noticed a lot of recipes for Hot Cross Buns appearing on Foodgawker, so I thought why not make that a new tradition? It was so difficult to pick one recipe out of the hundreds that appeared. I just wanted a simple recipe with not a lot of mix-ins. I'll go for complicated later, so I landed on this one.

Hot Cross Buns Hot Cross Buns

The recipe is called a cake, but I made them into traditional hot cross bun shapes. You can also divide the dough into three equal parts and make a braid. Not at all a difficult dough to work with. It's not sticky so you don't get all of it on your hands. I think my perception of Hot Cross Buns were basically scones but with yeast, so they didn't turn out as sweet as I had expected. I should find a bakery that sells Hot Cross Buns and see what they're supposed to taste like. The zests of the orange and the lemon were definitely flavor boosters. I would add more next time. Instead of using cranberries, I think I will plump up some raisins and add a little less into the buns. I do have other recipes I would love to make, so next year, one of those will be made before I make these again.

Hot Cross Buns

By the way, I don't have special piping tools, but I was still able to make these cross shapes on the buns with Ziploc bags! Either for the flour paste or for the sugar glaze, pour into a Ziploc bag, seal it, and snip a small piece of the corner off. Then pipe! So easy. I also don't have a pastry brush, so I used the back of a spoon. Works just as well.

Glaze for Hot Cross Buns

I hope all of you are enjoying your traditional Easter festivities. Last year, my housemates and a few other friends stuffed lots and lots of chocolate into plastic eggs. We then proceeded on an egg hunt and ate all the chocolates inside. There was a lot of candy-eating because a housemate gives up sweets for Lent every year and after Easter, she can finally eat them! (I won that egg hunt, by the way.) This year, only two of us are back at the house so far so we don't have any special egg hunts planned.

Croation Easter Cake [Makes 16 buns]
Adapted from Honest Cooking

- 5 cups (500 g) all purpose flour, sifted
- 2 tsp (7 g) active dry yeast
- 1/2 cup (100 g) granulated sugar
- 7 tbsp (100 g) butter, melted
- 2 eggs
- 1 lemon, zested
- 1 orange, juiced and half of it zested
- 5 oz (150 ml) warm milk
- 1 cup (100 g) dry cranberries
- 1 egg yolk

- 4 tbsp flour
- 4 tbsp water

- 4 tsp milk
- 12 tbsp powdered sugar

1. In a small bowl, combine dry yeast with 1 tsp sugar and 150 ml warm milk. Let rise for 5 minutes.
2. In a another bowl, combine cranberries with orange juice and leave for 1 hour.
3. In a large bowl, add sifted flour, sugar, yeast mixture, melted butter, eggs, lemon zest, and orange zest. Knead until the dough forms, it should be on the soft side. Cover with plastic wrap and let rise for 1 hour.
4. Drain cranberries (don’t discard orange juice, drink it) and knead them into the risen dough. Divide it into 3 equal parts and roll into long, equal rolls. Entwine them to make braid. Here you can also divide the dough into equal pieces and make hot cross buns. Place on baking sheet covered with parchment paper and brush with egg yolk. Let rise for 20 minutes.
5. If making hot cross buns, stir together the 4 tbsp flour and water. Place into Ziploc bag, snip off a piece of the corner, and pipe cross shapes.
5. Preheat oven to 355F and bake for 30 minutes. While it is baking, stir together the 4 tsp milk and powdered sugar for the glaze. Place into Ziploc bag, snip off a piece of the corner, and pipe cross shapes onto the buns. Let cool.

Thursday, January 13, 2011

Lambert's Cafe Throwed Rolls

I am pretty horrible at catching. If you were to throw something at me, I'd freak out for a minute and then try to catch it, but fail horribly. So if I wanted to eat rolls at Lambert's Cafe, I'd have better luck bringing my own bread. Lambert's Cafe is a Missouri and Alabama restaurant chain. I have never been there and probably won't ever be there, but I found the recipe for their "throwed rolls" while searching for dinner roll recipes. It's an intriguing concept and really makes that cafe a unique place, but I can't imagine myself eating there. Bread is constantly eaten and people eat it while they're waiting for their food and even when they get their food. So what I see happening in the cafe is that every few minutes, bread is flying around all over the place. Sounds like a comedy. But anyway, I'd imagine it can be frustrating for people who can't catch (like me) so I can just taste their rolls by using this recipe.

They are quite yummy rolls though so maybe it's worth all the effort in throwing and catching. You must eat them while they are still warm. I think it tastes the best then. If cold, heat them up in the microwave for 30 seconds. I split one in half and drizzled pancake syrup all over for a sweet fix. I can't help but question what made them choose such a shape for their rolls. Did they carry out experiments to see which ones yielded the best results or was it happenstance? You know, this sounds like an fun experiment to carry out on my own...

Cafe Lambert's Throwed Rolls

Lambert's Cafe Throwed Rolls [Makes 12 rolls]
From Dine and Dish

- 1 tsp sugar
- 1 1/4-oz package dry active yeast
- 1/4 cup tepid water (105 to 110 degrees)
- 1 cup warm milk
- 1/4 cup butter, melted
- 1/4 cup sugar
- 1 egg, at room temp and beaten
- 1 tsp salt
- 4 cups all-purpose flour

1. Combine sugar and yeast in tepid water. Let stand for 5 to 10 minutes until yeast begins to foam.
2. Thoroughly mix milk, butter, sugar, egg and salt in large bowl. Stir in the yeast mixture and 3 1/2 cups of flour, adding a bit more if necessary to make a soft, pliable dough.
3. Turn dough out on floured board and let rest while you clean and butter bowl. Knead dough gently for 4 to 5 minutes, adding flour if necessary, until dough is smooth and silky.
4. Return to bowl, cover with plastic wrap, and let rise in warm place until doubled in size (1 1/2 hours approximately).
5. Butter a 12 cup muffin tin.
6. Punch down dough. Pinch off pieces that are about 1 1/2 inches in diameter, (enough to fill one-half of muffin cup), and roll into smooth spheres. Place two such pieces in each prepared muffin cup (it will be a tight fit). Cover dough loosely with plastic wrap for 45 minutes.
7. Bake rolls in oven preheated to 350F for 20 to 25 minutes, or until light brown. Serve as soon as they are cool enough to throw.

Saturday, July 24, 2010

Blueberry Cinnamon Rolls

A few weeks ago, my parents went to a family friend's for dinner and came home with a ziploc bag full of Jersey blueberries. I was never a fan of any blueberries until I tried these. They were freshly picked and tasted tart, sweet, and juicy. I thought all blueberries would taste just as bland and chemical-y as the store-bought ones, but was I wrong or was I wrong? Wanting to get some of our own, my mom found out the address of the farm where the berries came from and decided to go on a morning when it wouldn't be too hot. Twice were her plans foiled due to the rain. Finally, last Saturday when the forecast showed no rain, my mom and I headed out.

It's a 40-minute drive from our house. The farm probably has other fruits and vegetables planted, but the blueberries seemed to take up a majority of the place! We were provided with a huge plastic container to place our picked berries into and guided to two rows that had not been picked yet. It was my first time picking blueberries, or any fruit for that matter, and it was so much fun. The blueberries came off the branches very easily and gently. They seem fragile but are actually quite tough as they don't get too damaged when tossed into a pile. I'm sad I didn't think to take a picture of the unpicked berries, but we'll be going again next year.

After an hour, we left the farm with 24 pounds of blueberries. You know what the best part is? It was only 90 cents per pound. You can never get blueberries that cheap at any store around here!

Freshly Picked Jersey Blueberries

Aren't they beautiful? :)

Of course, I had to bake with these. Though I never ate blueberries by themselves before, I did eat them in baked goods. I think blueberries are at their best when baked into something. They add such moisture to whatever you put them in. A few days after our blueberry adventure, I saw a recipe for Blueberry Cinnamon Rolls. I immediately bookmarked it to make it when I have a free morning.

I have made only two things with yeast before: buns filled with red bean paste and bagels. The buns turned out great! Though they didn't rise quite as much as I would have liked them to. And the bagels... Eh. Great only when slightly warm and flatter than a bagel should be. I was nervous about how this would turn out!

Blueberry Cinnamon RollsBlueberry Cinnamon Rolls

I let the ball of dough rise for 2 1/2 hours and rise, they certainly did! I kept sneaking peeks and was so happy that it was rising. Then it was rolled out and topped with cinnamon sugar and blueberries. I should work on my cinnamon bun rolling skills because I didn't roll it tightly enough. The buns turned out extra wide with gaps inside the spirals. I should also remember that if I'm going to halve the amount of sugar for the glaze, I should also halve the amount of milk! Why the glaze is clear. For my first attempt though, I think they turned out pretty darn okay! They may not be the prettiest things, but I can work on that. I've got my notes to help me. I'd add more cinnamon, too. I couldn't taste it at all with the given amount. I definitely should not have left out the lemon. Forgot to buy it, but it would've been a nice addition.

Blueberry Cinnamon Rolls

Blueberry Cinnamon Rolls
Adapted from Annie's Eats

For the rolls
- 6 1/2 tbsp sugar
- 1 tsp salt
- 5 1/2 tbsp butter, at room temperature
- 1 egg, slightly beaten
- 3 1/2 cups bread flour
- 2 tsp rapid rise yeast
- 1 cup + 2 - 4 tbsp buttermilk, at room temperature

For the filling
- 3 tbsp + 1 tsp sugar
- 3/4 tsp ground cinnamon
- 1 1/2 cups blueberries

For the glaze
- 3 cups powdered sugar
- 6 - 7 tbsp milk

1. Cream together sugar, salt and butter until smooth. Mix in egg until incorporated. Mix in flour, yeast and milk until a dough forms. Use dough hook on electric mixer to knead for 8 minutes or use your hands until the dough is silky and supple, tacky but not sticky.
2. Spray a large bowl with cooking spray and transfer the dough to the bowl, turning once to coat. Cover with plastic wrap and let rise at room temperature for about 2 hours, or until doubled in size.
3. Roll out dough into a rectangle with a rolling pin, lightly dusting the dough with flour if needed to keep it from sticking (about 12x14 inches for larger rolls or 9x18 inches for smaller rolls).
4. Combine the sugar and cinnamon in a small bowl and mix to blend. Sprinkle the cinnamon sugar mixture over the surface of the dough. Sprinkle the berries over the top evenly of the dough.
5. Starting with the wide edge, roll up the dough into a cigar-shaped log, creating a cinnamon sugar spiral as you roll. Pinch the seam shut, and with the seam side down, slice the log into your desired number of rolls. Transfer them to a baking sheet lined with parchment paper, placing the rolls about 1/2 - 1 inch apart.
6. Cover loosely with plastic wrap and let rise at room temperature 75-90 minutes, until the rolls have grown into each other and have nearly doubled in size. At this point, the rolls can also be covered and retarded in the refrigerator for up to 2 days. Pull the pan out of the refrigerator 3 - 4 hours before baking to let the dough proof.
7. Preheat the oven to 350F. Bake for 20 - 30 minutes, or until golden brown. Let cool in the baking about 10 minutes, then transfer to a wire rack. Whisk together the glaze ingredients in a medium bowl until smooth and then swirl over the top of the cinnamon rolls. Let cool at least 15 - 20 minutes before serving.